Texturing the models
Looking back on the Star Destroyer model I feel that I could have done things a bit differently. Rather than add the detail in the modelling process I should have used textures to create a similar effect. This way the model would have have had a lower poly count and so would have been easier to move around the 3D world. Thankfully by the time I modeled the Blockade Runner I had learned my lesson well.
Texturing the Ships
As I'm still a texturing newbie I haven't yet mastered the art of creating textures in Photoshop so basically I cheated a bit and hunted for my textures online. It wasn't an easy job finding a texture that matched and in hindsight it might have been easier to create my own from scratch which is exactly what I've started to do. I did manipulate the texture I found in Cinema 4D however just to get something that's a bit more of my own. There are some decent tutorials out there on how to create textures in Photoshop. Follow the link below and you'll find a real gem of a tutorial which looks at creating a metallic texture in Photoshop. This tutorial looks at using distortion techniques to create some interesting effects.
http://www.tutorialwiz.com/metallic_background/
This next tutorial looks at creating a stone texture. This will get you used to adding depth to a texture which will help you to create bumps and uneven sections on a metallic surface.
http://www.phong.com/tutorials/newstone/
I followed similar principles when creating textures for the Blockade Runner and Tie Fighters however with the Blockade Runner I added a bit more detail by adding layers. I was able to add some battle damage type effects using this technique. I learnt all about layers from this tutorial which shows you how to create a realistic water texture. What does this have to do with intergalactic spaces craft you may ask. Well I learnt a lot from this tutorial which I have applied to many different texture types from skin to rock; http://www.youtube.com/watch?v=GrHabbtu0eY
When it came to texturing the planet I used a decent texture for planet earth. This tutorial explains how to create a realistic planet earth;
http://www.cinema4duser.com/tech_tutorial01.html
In the next part of this analysis I will look at arranging the models, the cameras and lights.
counter

Friday, 21 October 2011
Friday, 23 September 2011
Creating Star Wars opening scene in Cinema 4D part 1
A few months ago I decided to create the opening scene of Star Wars in Cinema 4D. It was one of those random ideas that just popped in my head so I'm surprised I saw it through to the end. Anyway, I thought would explain how I made the film from the modelling process through to the editing stage for anyone who might be a little but curious. Each week I will look at a different stage of the creation process. I will also mention the tutorials that helped me along the way.
- Week 1: Modelling the ships
- Week 2: Texturing the ships
- Week 3: Arranging the models, cameras and light in the scene
- Week 4: Editing the footage and adding the sound and music
Star Destroyer modelling process
I won't tell a lie, I have never been comfortable modelling anything space ship related particularly when I try to design my own. I tend to fair a bit better when modelling something that exists from TV or film. With that in mind I decided to make sure that I had enough pictures of the ship so that I had something to draw from. I also had reference images to help me get the proportions right. The following is a breakdown of the techniques I used;
- I set up my ref images in the side, front and top views.
If you click on the link below you'll find a decent tutorial on setting up reference images.
- I decided to create my model from a cube primitive. I started to using points however I couldn't get to grips with this method of modelling. I'm used to modelling from a primitive, particularly when it comes to characters.
- I made the cube editable by pressing c on the keyboard. (windows users)
- After stretching the cube to make it fit the refs I used the knife tool to make a series of cuts. After I was happy with the cuts that had been made I set about deleting parts of the cube to get the basic shape of the Star Destroyer.
- The next step involved moving points to match the ref images.
- Once I had the shape of the model sorted out I used the mirror tool to create a duplicate of it just below. I had a lot of trouble getting the mirrored object in the right place. It inloved plenty of trial and error. I've never really been comfortable using the mirror tool but I'm trying to get to grips with it as it is quite useful when it comes to character rigging.
- The next stage involved connecting the two parts of the model together. I used edge extrude to pull down one half of the model to meet the other. This didn't go quite to plan as the extruded area didn't meet the bottom of the model in a desirable way. Basically I didn't know how to connect it and I didn't even know if this was even possible. After much research I was none the wiser. I aligned the extruded part as best as I could and carried on regardless.
- Next it was a case of adding the details. This meant using a variety of tools and techniques. I used the knife tool, bool and a series of extrusions. I also used cube primitives (edited) to add some finer detail to the ship.
The links below will take you to some tutorials that show you how to model from a cube primitive.
This one gives you an idea of how you could model a ship.
This one looks at modelling a water faucet. Not quite a spaceship I hear you say but it will give you an idea of how you could model one using the same basic principles.
So, that's week 1 out of the way. Next week I'll look at how I textured the models. See you then.
Saturday, 23 April 2011
Star Wars short Cinema 4D animation
Here's a Star Wars animation that I created a few months back. I'll explain how I put it together in my next blog.If anyone wants to comment on it or if you want to make suggesting as to how I could make improvements then please leave a comment. See you next time.
Monday, 18 April 2011
Choosing the right modelling method
After a very long hiatus I have returned to write about what I know best; everything 3D modelling related. During my time away from blogging I have been soaking up the 3D modelling scene to try and gain a bit more knowledge about building low polygon characters. My usual method of character modelling is effective enough but I wanted to see if there are any alternative methods on the internet. I managed to find a couple of informative tutorials but before I go into any detail I'll quickly explain how I've been modelling my characters in Cinema 4D.
- I'll drop a cube object into the scene and increase the number of segments.
- After I've made the cube editable I'll delete half of it and place it into a symmetry object (this really makes the modelling process a lot easier).
- I will also pop the cube and the symmetry object under a HyperNurbs. From there I will make a series of extrusions and cuts to to get the desired look.
I've always found character modelling to be frustrating, particularly when the symmetry object causes unexpected deformations. Thankfully after much experimentation I am able to spot any errors that the symmetry object might cause. Overall though, character modelling can be a rewarding experience. Now, on to the aforementioned websites.
The first website looks at modelling a character by starting with the leg and building up the body from there. This is a great way to model as you can be more precise with your extrusions and for the basic body shape you won't need to make as many knife cuts. You can find the website by following the link below;
It's great to have as many methods of character at hand as possible. This website shows you how to model using a drawing which you can use as a guide. A great level of detail can be achieved using this method.
The second website that I checked out looks at adding detail to the face. I wanted to add facial detail to my character however I needed a few tips to gain a bit more confidence. The following link will take you to a very thorough face modelling tutorial;
Check out these two tuts and I promise you won't be disappointed. By combining various tutorials and techniques you will find that the modelling process becomes much easier. That's all for now.
Wednesday, 15 September 2010
Cinema 4d star wars scene
Just a quick blog to let everyone know that I'm back from my holidays and ready for action. So, what have I been up to in the Cinema 4d world this past couple of weeks; well I'm still working on my little Star Wars project and it's almost ready for its debut on You Tube. There have been problems galore though. The toughest problems I faced didn't involve special effects or modelling, no it was the setting up of the scene that gave me a few moments of frustration. To give the impression that the star destroyer was even bigger than it looked I played around with aperture width and the focal length in the camera settings.
As promised I will put up a tutorial of how to set up the scene in a future blog but first I have a film to finish. That's all for now.
Friday, 27 August 2010
Star Wars opening scene: in Cinema 4d
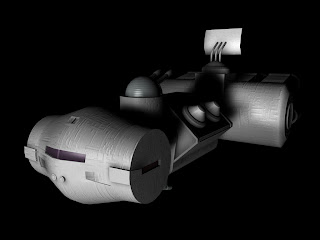
I have decided to challenge myself to see if I can recreate the opening scene of Star Wars in Cinema 4d, beginning with the famous crawl and ending just before we enter the blockade runner scene. I've built the two ships involved in that opening section (the Star Destroyer and the Rebel Blockade runner) and hope to put everything together so that it is as close a match to the scene as possible. Once it's all done and dusted including editing, music and sound effects I'll upload it to You Tube. After all of thats out of the way I'll put up a tutorial on my blog pointing out how I put the scene together. But first I have quite a bit of work to do. I'll keep you posted. That's all for now folks.
Here's a pic of the Rebel Blockade Runner.
Friday, 20 August 2010
cinema 4d: build a car using points
I have taken the plunge into advanced cinema 4d territory by creating a using the points based method so I thought I would write a series of blogs about my experiences. This won't be a step by step look at building the entire car but I will provide enough information to get you past the initial stages. In this first blog I will focus on setting up the blueprints.
1) If you're new to car modelling it would be best to choose something that you would be relatively easy to create rather than a car that has too many awkward features. You can find a decent range of car blueprints at the following web address;
Typing car blueprints in to Google will bring back plenty of blueprint web sites.
2) Once I've found my blueprint I'll copy and past it into photo editing software such as paint or Photoshop. Your blueprint should have three perspectives; top, side and front. Select the top perspective by using the selection tool, right click on it and then choose crop. Save as a j peg file to your Cinema 4d folder and then do the same with the other perspectives. Make sure that the front end of the car is facing right for the side perspective.
3) Open up Cinema 4d and choose the four way perspective. Go to edit - configure - in the top view. In the attributes manager go to back and click on the image button. Locate your top perspective image and open it up to load it to the screen. Do the same for the right and front perspectives. Make sure that the images are facing the correct way. In the top view the front end of the car should be facing down and in the side view the font end should be facing right.
4) Now comes the tricky part. Add a null object and in the top view place it at the front of the car in the middle. Now it's just a case of aligning the other images so that the null object is situated at the front of the car in all viewpoints.
It's important to take time setting up the blueprints otherwise problems will occur down the line. Well, we've come to the end of the first part of the tutorial. Hope it went OK. Any comments would be appreciated. Thanks. That's all for now folks.
Subscribe to:
Posts (Atom)