counter

Friday 27 August 2010

Star Wars opening scene: in Cinema 4d

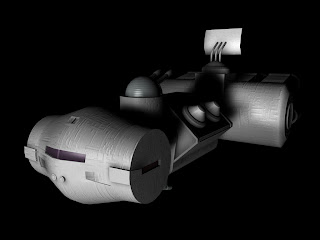
I have decided to challenge myself to see if I can recreate the opening scene of Star Wars in Cinema 4d, beginning with the famous crawl and ending just before we enter the blockade runner scene. I've built the two ships involved in that opening section (the Star Destroyer and the Rebel Blockade runner) and hope to put everything together so that it is as close a match to the scene as possible. Once it's all done and dusted including editing, music and sound effects I'll upload it to You Tube. After all of thats out of the way I'll put up a tutorial on my blog pointing out how I put the scene together. But first I have quite a bit of work to do. I'll keep you posted. That's all for now folks.

Here's a pic of the Rebel Blockade Runner.


Friday 20 August 2010

cinema 4d: build a car using points

I have taken the plunge into advanced cinema 4d territory by creating a using the points based method so I thought I would write a series of blogs about my experiences. This won't be a step by step look at building the entire car but I will provide enough information to get you past the initial stages. In this first blog I will focus on setting up the blueprints.

1) If you're new to car modelling it would be best to choose something that you would be relatively easy to create rather than a car that has too many awkward features. You can find a decent range of car blueprints at the following web address;


Typing car blueprints in to Google will bring back plenty of blueprint web sites.

2) Once I've found my blueprint I'll copy and past it into photo editing software such as paint or Photoshop. Your blueprint should have three perspectives; top, side and front. Select the top perspective by using the selection tool, right click on it and then choose crop. Save as a j peg file to your Cinema 4d folder and then do the same with the other perspectives. Make sure that the front end of the car is facing right for the side perspective.

3) Open up Cinema 4d and choose the four way perspective. Go to edit - configure - in the top view. In the attributes manager go to back and click on the image button. Locate your top perspective image and open it up to load it to the screen. Do the same for the right and front perspectives. Make sure that the images are facing the correct way. In the top view the front end of the car should be facing down and in the side view the font end should be facing right.

4) Now comes the tricky part. Add a null object and in the top view place it at the front of the car in the middle. Now it's just a case of aligning the other images so that the null object is situated at the front of the car in all viewpoints.

It's important to take time setting up the blueprints otherwise problems will occur down the line. Well, we've come to the end of the first part of the tutorial. Hope it went OK. Any comments would be appreciated. Thanks. That's all for now folks.
Wednesday 18 August 2010

Cinema 4d car rigging problems

I've been away from the world of blogs for a for couple of weeks and I put this down to car rigging in Cinema 4D. Trying to find a tutorial on how to rig a car is an almost impossible task particularly for Cinema 4D users but I managed to come across a basic tutorial which looked at wheel turns and movement. The tutorial was informative with easy to follow on-screen directions.

Just click below to check it out;


Now I am trying to add a suspension system to my rig which is a totally different level of difficulty altogether. I tried using spring dynamics but couldn't build a frame around the spring set up. I'm sure it's possible to use dynamics to build a spring based suspension rig as I have seen videos on You Tube which demonstrate this method. Well after searching through various forums I came across a Cinema 4D plug-in called Roll-it. I was impressed with this plug-in as it managed to plant the wheels of my car firmly on an uneven surface and keep them there as they rolled over the terrain. So I would like to say thanks to the developers of Roll-it.

You can download the plug-in by clicking below;


I have had a play around with this Plug-in and have so far been impressed. It's easy to get the ball rolling, pardon the pun, by simply dropping a terrain in to the floor tag and selecting geometry. Thankfully you can download an instruction manual from the same website to get in in depth look at how it all works. As far as my car rig was concerned I achieved a mixed bag of results. After applying the plug-in the wheels connected to an uneven surface but the car didn't move up and down with it. I would have to animate the movement of the car separately. This is not the fault of the plug-in though as it can't solve all of my problems. Anyway, I'll continue to play around with Roll-it and let you know if I discover anything new.

That's all for now folks.

Monday 9 August 2010

Tag challenge: Day 08: A photo that makes me sad

One part of my life that I regret the most is somehow losing all of my family photos when moving house. I only have one photo left from my childhood which was taken while on a school trip. It makes me sad to think that this is the only photo I can look at as a reminder of the past. I don't know what happened to all the family photos but I remember where they were kept just before the move.

Losing these photos has meant that I have lost all of my family pictures and I'll never get those back.

Saturday 7 August 2010

Tag challenge: Day 07: A photo that makes me happy

The photo that makes me feel happy shows my girlfriend and myself sitting on coach as we began our day trip to London. This photo makes me happy for a few reasons; firstly it's one of the first photos to show us as a couple at a time when we were beginning our journey together. It's definitely something nice to look back on. And of course there is the memory of the day itself. This was my first trip to London and what a good one it was too. I was spoilt for choice as to what to do for the day and in the end we spent much of the day in the Science Museum. As I enjoy all things science based it was entertaining enough to keep me quiet for the day.

Thursday 5 August 2010

Tag challenge: Day 06: retro gaming tickles my fancy

I've been a bit slack with this tag challenge so I thought I had better get back on track and talk about something that tickles my fancy. There are plenty of things that tickle my fancy (must keep a straight face) but none more so than retro gaming and with thousands of old titles lurking out there its an interest that will last a long time. I've been into video games since the early 80s with iconic games such as Pacman eating at my holiday money. Its nice to be able to play these games again through my PC and relive my childhood days of gaming fun without the need for a pocket full of 10p coins.

The games I remember the most are side scrolling Beat em ups, a breed of game that is now pretty much defunct. Notable beat em ups include the Double Dragon, a classic game and one that popularised the genre. This game impressed me at the time with its large detailed sprites, realistic sound effects and most importantly the memorable music. Final Fight is also considered by many to be the ultimate scrolling beat em up. This game improved upon Double Dragon with even larger sprites and more action. The genre started to disappear in the 90s but this is when my favourite beat em up hit the arcades. Cadillacs and Dinosaurs renewed my faith in the genre after a few years without a decent release. The title says it all really. I like cars and Dinosaurs so together they are an unbeatable force. Throw in a multitude of weapons including Uzi's and Grenade launchers and you have a beat em up to beat the rest, erm, up.

So you can now see that I kind of like retro games.


Wednesday 4 August 2010

Hollywood films that use Cinema 4D

Cinema 4D has proven its versatility in the film industry many time in such films as District 9 and Cloudy with a chance of Meatballs. The latest film to add Cinema 4D to its arsenal of special effects software is Tron Legacy, the sequel to a film that needs no introduction. It's kind of nice to know that the software I use to create 3d models is used in big budget Hollywood blockbusters. So I just wanted to give this and some other films a quick mention. Quite often Cinema 4D is used for Matte painting but this time around the 3D applications spline capabilities are being used for the bike scenes.

District 9 took advantage of Cinema 4Ds Bodypaint 3D capabilities for the aliens. Cinema 4D has powerful tools that can help replicate smoke effects and these were used in the Bruce Willis film Surrogates. GI Joe: Rise of the Cobra used Bodypaint 3D to texture various models in the film. Here's hoping Cinema 4D continues to be used for future film releases.

Monday 2 August 2010

Tag challenge: Day 05: favourite quote

I didn't have to think too long about this one. 'Here's another nice mess you've gotten me into'. This quote brings back memories of watching Laural and Hardy in my younger years so it is something that has stayed with me. This is one of the most enduring quotes in film history and is still remembered by many people to this day however it is often misquoted as 'Here's another fine mess you've gotten us into'. So there you go, a well remembered quote from a well remembered comedy duo.